0%

Raspberry Pi に電源ボタンを付ける

Raspberry Pi に電源ボタンを付けるサンプル。

OS が起動していない状態でボタンを押すと、OS を起動する。

OS が起動している状態でボタンを 3 秒間押し続けると、OS をシャットダウンする。

配線図

adding-power-button-to-raspberry-pi.png

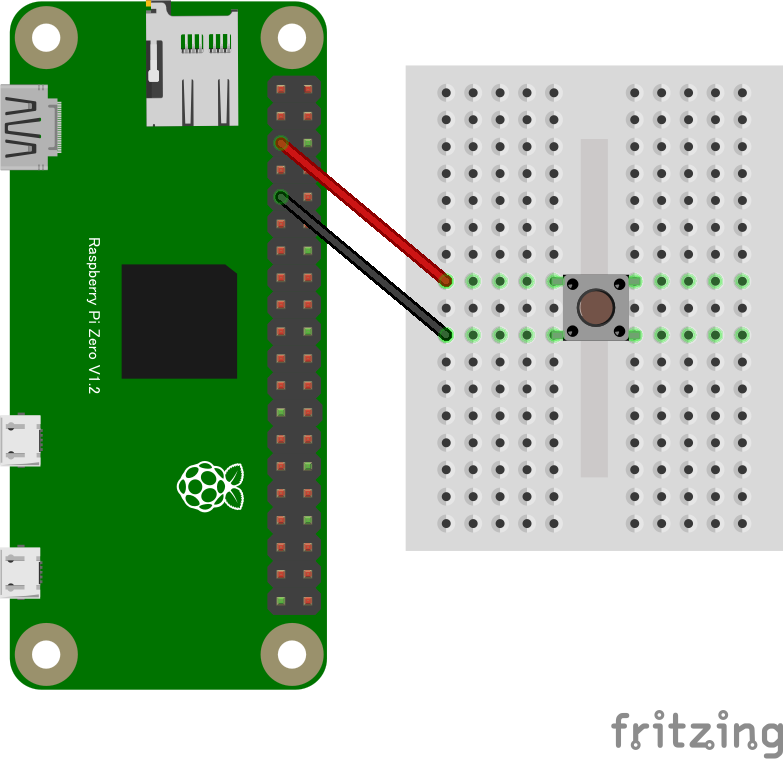
  • ジャンパー ワイヤー (赤): BCM3 (ピン番号 5)
  • ジャンパー ワイヤー (黒): GND

スクリプト

shutdown.py:

1
2
3
4
5
6
7
8
9
10
11
12
13
14
15
16
17
18
19
20
21
22
23
24
25
26
27
#!/usr/bin/python
# -*- coding: utf-8 -*-

import RPi.GPIO as GPIO
import os
import time

PIN = 3

GPIO.setmode(GPIO.BCM)

# プルアップ抵抗を有効にする
GPIO.setup(PIN, GPIO.IN, pull_up_down=GPIO.PUD_UP)

while True:
# 立ち下がりエッジが検出されるまで待機する
GPIO.wait_for_edge(PIN, GPIO.FALLING)

# 3 秒の長押し
i = 0
while GPIO.input(PIN) == GPIO.LOW:
i += 1
if i > 30:
os.system("shutdown -h now")
break

time.sleep(0.1)

OS の起動

BCM3 (SCL1) と GND を接続するだけで動作する。

OS が起動していない状態でボタンを押す。

OS のシャットダウン

以下のコマンドでスクリプトを実行してから、ボタンを 3 秒間押し続ける。

1
2
$ chmod +x shutdown.py # 実行権限を付与
$ ./sudo shutdown.py # 実行

スクリプトの自動実行

OS の起動時にスクリプトを自動的に実行するようにする。

/etc/rc.local を編集して、exit 0 の直前に shutdown.py を追加する。

例:

1
2
3
4
5
6
7
8
9
10
11
12
13
14
15
16
17
18
19
20
21
22
23
#!/bin/sh -e
#
# rc.local
#
# This script is executed at the end of each multiuser runlevel.
# Make sure that the script will "exit 0" on success or any other
# value on error.
#
# In order to enable or disable this script just change the execution
# bits.
#
# By default this script does nothing.

# Print the IP address
_IP=$(hostname -I) || true
if [ "$_IP" ]; then
printf "My IP address is %s\n" "$_IP"
fi

/usr/local/bin/shutdown.py # 追加

exit 0

トラブルシューティング

スクリプトを実行すると “A physical pull up resistor is fitted on this channel” が表示される

1
2
3
pi@raspberrypi:~ $ shutdown.py
/home/pi/shutdown.py:13: RuntimeWarning: A physical pull up resistor is fitted on this channel!
GPIO.setup(PIN, GPIO.IN, pull_up_down=GPIO.PUD_UP)

このチャンネルには物理的なプルアップ抵抗が取り付けられています。

本来なら BCM3 (SCL1) に GPIO.setup(PIN, GPIO.IN, pull_up_down=GPIO.PUD_UP) は不要。

このサンプルでは、ピンの可変性を考慮して記述している。